BIND9 is a popular domain server application in *nix platform. It serves an important roles in providing an open source DNS application for the Internet and local area network (LAN).
This publication explains how to install a Win32 BIND9 version that can be used as a personal caching DNS server in Windows Vista.
Step 1: Download BIND9 binary application for Win32 from Internet Consortium System website.
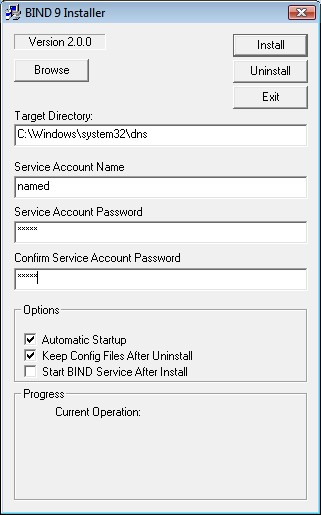
Step 2: Unzip the downloaded file to a folder (i.e., c:\bind9) and run the installer file named “BINDInstall.exe”. This will install Bind9 to the destination folder at \Windows\System32\dns\bin\.

Step 3: During the installation process, the installer will ask for a “Service Account Password”, select “automatic startup” then click install. Exit the installer when finished.
Step 4: Open the Command Prompt as Administrator / Run as Administrator and type the following commands :
cd c:\windows\System32\dns\bin (press enter)
wrote key file “C:\Windows\system32\dns\etc\rndc.key”
rndc-confgen -a (press enter)
Step 5: Close the command Prompt
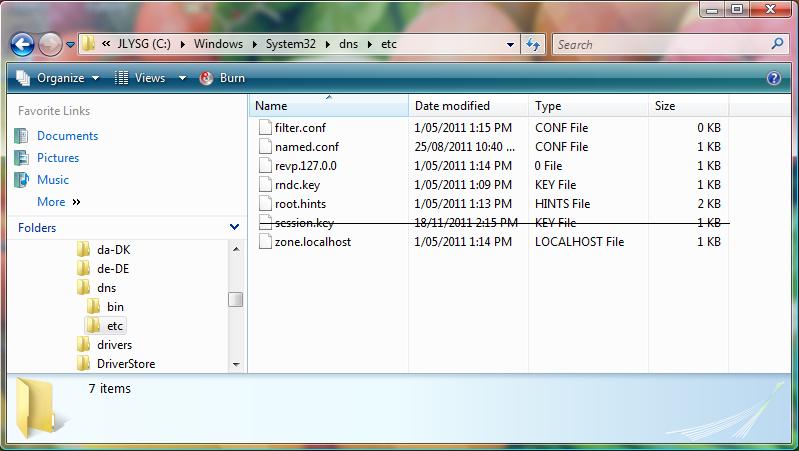
Now there should be six files existed in the folder c:\windows\system32\dns\etc as shown in the picture below, except session.key file.

=
Note that The file “rndc.key” file has been created step 4.
Step 6: Open Notepad (Run as Administrator) and copy and paste the following:
options {directory "c:\windows\system32\dns\etc";
pid-file none;
version "not currently available";
listen-on { 127.0.0.1; 192.168.0.0/24; 180.216.59.213; };
};
controls {
inet 127.0.0.1 allow { localhost; } keys { rndc_key; };
};
key "rndc_key" {
algorithm hmac-md5;
secret "o690RparSJLi5da4mjPB/Q==";
};
zone "." IN {
type hint;
file "root.hints";
};
zone "localhost" IN {
type master;
file "zone.localhost";
allow-update { none; };
};
zone "0.0.127.in-addr.arpa" IN {
type master;
file "revp.127.0.0";
allow-update { none; };
};
include "filter.conf";
Note that before saving this file it is need to change the key string secret “o690RparSJLi5da4mjPB/Q==” to the same key string found in your file “rndc.key”. The key in your rndc.key file will be different to the one shown here. To get the key, open rndc.key file using Notepad and copy & paste the appropriate key for your system.
Also, it is needed to change the line listen-on { 127.0.0.1; 192.168.0.0/24; 180.216.59.213; }; with the corresponding IP address(es) that match the network where the caching DNS will be used.
Save the file as named.conf (Note: Run Notepad as Administrator to have rights to write or save at c:\Windows\System32\dns\etc\)
Step 7: Create a new file using Notepad and copy & paste the following root hints information into the file.
; <<>> DiG 9.3.2 <<>> NS . @m.root-servers.net

; (1 server found)

;; global options:  printcmd

;; Got answer:

;; ->>HEADER<<- opcode: QUERY, status: NOERROR, id: 1378

;; flags: qr aa rd; QUERY: 1, ANSWER: 13, AUTHORITY: 0, ADDITIONAL: 15
;; QUESTION SECTION:

;.                IN    NS
;; ANSWER SECTION:

.            518400    IN    NS    A.ROOT-SERVERS.NET.

.            518400    IN    NS    I.ROOT-SERVERS.NET.

.            518400    IN    NS    C.ROOT-SERVERS.NET.

.            518400    IN    NS    H.ROOT-SERVERS.NET.

.            518400    IN    NS    M.ROOT-SERVERS.NET.

.            518400    IN    NS    E.ROOT-SERVERS.NET.

.            518400    IN    NS    K.ROOT-SERVERS.NET.

.            518400    IN    NS    L.ROOT-SERVERS.NET.

.            518400    IN    NS    B.ROOT-SERVERS.NET.

.            518400    IN    NS    J.ROOT-SERVERS.NET.

.            518400    IN    NS    D.ROOT-SERVERS.NET.

.            518400    IN    NS    G.ROOT-SERVERS.NET.

.            518400    IN    NS    F.ROOT-SERVERS.NET.
;; ADDITIONAL SECTION:

A.ROOT-SERVERS.NET.    3600000    IN    A    198.41.0.4

B.ROOT-SERVERS.NET.    3600000    IN    A    192.228.79.201

C.ROOT-SERVERS.NET.    3600000    IN    A    192.33.4.12

D.ROOT-SERVERS.NET.    3600000    IN    A    128.8.10.90

E.ROOT-SERVERS.NET.    3600000    IN    A    192.203.230.10

F.ROOT-SERVERS.NET.    3600000    IN    A    192.5.5.241

G.ROOT-SERVERS.NET.    3600000    IN    A    192.112.36.4

H.ROOT-SERVERS.NET.    3600000    IN    A    128.63.2.53

I.ROOT-SERVERS.NET.    3600000    IN    A    192.36.148.17

J.ROOT-SERVERS.NET.    3600000    IN    A    192.58.128.30

K.ROOT-SERVERS.NET.    3600000    IN    A    193.0.14.129

L.ROOT-SERVERS.NET.    3600000    IN    A    199.7.83.42

M.ROOT-SERVERS.NET.    3600000    IN    A    202.12.27.33
When done, save the file as root.hints at C:\Windows\System32\dns\etc\.
Step 8: Create a new file using Notepad and copy & paste the following zone localhost information into the file.
;

; loopback/localhost zone file

;

$TTL 1D

$ORIGIN localhost.

@              IN  SOA   @  root (

1   ; Serial

8H  ; Refresh

15M ; Retry

1W  ; Expire

1D) ; Minimum TTL

IN   NS   @

IN   A    127.0.0.1
When done, save the file as zone.localhost at C:\Windows\System32\dns\etc\.
Step 9: Create a new file using Notepad and copy & paste the following information into the file.
;

; reverse pointers for localhost

;

$TTL 1D

$ORIGIN 0.0.127.in-addr.arpa.

@    IN   SOA  localhost. root.localhost. (

1    ; serial

8H   ; refresh

15M  ; retry

1W   ; expire

1D ) ; minimum

IN   NS   localhost.

1    IN   PTR  localhost.
When done, save the file as revp.127.0.0 at C:\Windows\System32\dns\etc\.
Step 10: Create a new file using Notepad and leave it empty (a blank file). Save the file as filter.conf at C:\Windows\System32\dns\etc\. It is an empty file and It will be filled with filter information if Bind9 is to be used to block adverts.
Step 11: Starting BIND9. In order to start the new BIND9, Open a Command Prompt (Run as Administrator) and type the following:
services.msc (press enter)
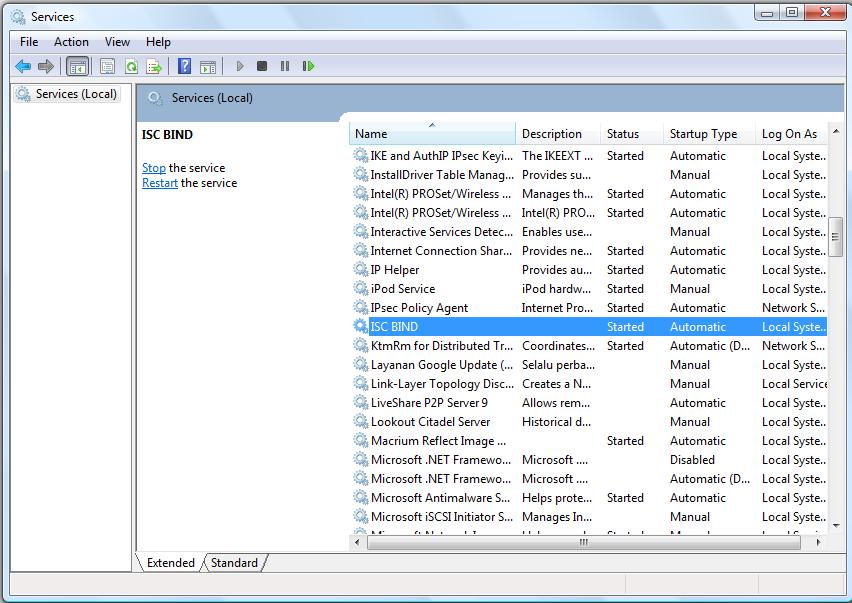
This will open Windows Services list as shown below.

Windows Services List
=
Scroll to find ISC BIND service line (as shown in the picture above), then right-click to open Properties dialog box for ISC BIND.

BIND9 Properties
Set the option Startup type to Automatic and click Start button to start ISC BIND for the first time. If there are no errors, BIND9 will be started and the Service status will changed from Stopped to Started.
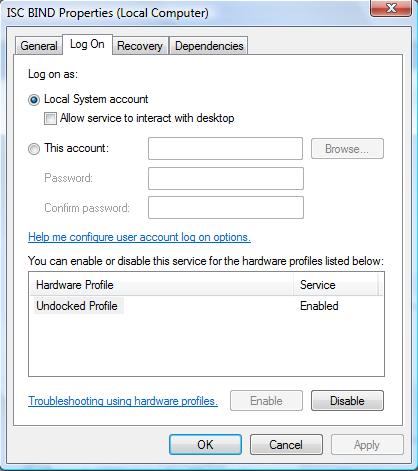
If there is an Windows error message saying: Windows could not start the ISC BIND on Local Computer. Error 1067: The process terminated unexpectedly. Then check Log On Properties for ISC BIND. Click on the Log On tab in the Properties window and check that log-on setting matched the one shown below.

BIND9 Properties
Click OK to close the Properties window and try to restart ISC BIND via Services window again. When done, BIND9 is now running in local computer (127.0.0.1) and ready to be used.
To test or use BIND9 as a personal DNS Caching server at the computer in which it is installed, put 127.0.0.1 as Preferred DNS server in the network setting of the computer.
Reference page: http://npr.me.uk/installdns.html


